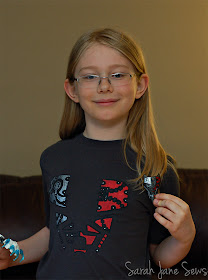
I started by taking a photo of the chest plate using a macro filter. Then I used this tutorial (more or less) to make a stencil in Photoshop. I decided to stencil the black outlines and fill in the rest with a paintbrush. I'm sure there are simpler ways to do this, and you could definitely leave out more of the details and still get the general idea, but that's what I thought would work best for how we wanted it to look. We decided to leave out the part below the belt.
Cutting took around 2 1/2 hours, even leaving out some of the smallest details. My tips for such intricate freezer paper stencils (other than giving yourself a lot more time than I did) are to:
- Print out a copy on regular paper to use as a map of sorts to keep track of the pieces as you cut.
- Keep the map and pieces on a tray so nothing gets lost. I used a jelly roll pan.
- A hole punch works great for the tiny circles.
- Have a tweezers handy!
After all that time cutting, I was pretty worried I would screw it up, but the outline turned out great. Then I used a small -- very small -- paint brush to fill in the red and silver. You could also cut the stencil so that you're painting the silver and red parts and then add the outline after. It would be easier cutting for sure, but I wanted the placement of all the black elements to be exact. Yes, I may have a problem. The painting was actually really fun. If I had spread this project out over a few days, I would have enjoyed it a lot. It was cool to see it all come together. O was home by the time I was painting, and he was really encouraging about how it was looking. That was pretty adorable.
He went to bed before I had finished the silver, though, so the final product reveal this morning. He was thrilled, which made the many hours so worth it. We both agreed that the image could have been a bit larger, but that it looks good anyway.
He commented many times on how accurate all the details were and how I had only left out a few tiny things. He said something like, "Anyone who knows Lego Hero Factory would know right away that this is Splitface's chest plate!" Haha. I think that's a small target audience, especially since it's a discontinued model, but I'm so happy that he loves it.
I can't imagine there are a lot of people out there who want a Splitface shirt and would like to put several hours into making one, but since I made the stencil template, I put it up here. If anyone DOES make one, I'd love to see it!
Happy Birthday, O!


It's perfect! Thanks for linking up at Inspire Us Thursday.
ReplyDelete