Friday, May 9, 2014

Ottobre Summer Basic Running Top

When I first discovered that you could buy wicking fabric a few years ago, I bought some questionable prints and colors in a coop, just because I was so excited about the existence of such things.  And they've been sitting in my stash ever since, because well, kind of fugly.  But with the convergence of the Spring Top Sewalong and the Spring Race Challenge, I decided to just dig in.  I wear a lot of things when I run that I wouldn't be caught dead in otherwise (see: super short skirts and leggings as pants), so I figured why not make a crazy top?


When I brought this fabric upstairs, Ray gave it the serious side-eye.  I'm still not sure how I feel about it, but I think it's better sewn up than it was as yardage.

I used the Summer Basic top pattern from Ottobre Woman 2/2013.  It doesn't get much simpler than two pattern pieces and some binding!  This is a straight size 36, but for future makes, I will grade to a size 34 from the waist down.  I like my running tops to have a looser fit through the middle, but where it comes in at the hips is just barely snug enough to stay up above my bum.


I followed the instructions as written, other than leaving out the clear elastic on the shoulder seams.  I didn't think it would be necessary with this fabric and also was concerned about potential chafing on long runs.  I even did the binding the Otto way, which I think is only the second time ever that I've done so.  I usually go for the serge on and topstitch method.  I'm really happy with how it turned out, especially the double needle topstitching.


I cut the neckline binding on the crosswise grain (I think? I always get lengthwise & crosswise confused) to get the stripes to to go the other way.  Since this is a 4-way stretch fabric, it worked fine.


I wore it on a 4-miler after I finished it up and was really happy with it.  I can definitely see more of these in my future, both for running and casual wear.


What do you think about this print -- hideous, cute, or somewhere in between? I honestly can't decide.  I also have a pale pink with tiny black flowers (everything about that is so not me) that is destined to be an XYT tank in the near future. 

Wednesday, May 7, 2014

The Birthday Shirt: Lego Hero Factory Splitface Tee [with Template]

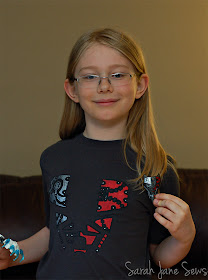
Today is O's ninth birthday!  Most years one of his presents is a special tee (earlier shirts: age 5, 7, 8), often one that he designs himself.  We've been talking about this year's for quite a while.  His first idea was a half gunmetal grey, half red shirt, a la the Lego Hero Factory character Splitface.  Easy enough.  Then he showed me the chest plate piece and I said, "Oh, why don't we freezer paper stencil on the design? That would be cool!"  He quickly agreed.  On the one hand, I didn't need to sew a shirt (although I did hem the sleeves of a long-sleeved tee to get one in the right color).  On the other hand, I didn't look closely enough at the piece.  It is super detailed!  I could have simplified it, but O is a detail guy, so I knew he'd appreciate it if I made it as accurate as possible.  I would not necessarily recommend that you try to replicate this in one day or cutting by hand with an x-acto knife.  But that's what I did.


I started by taking a photo of the chest plate using a macro filter.  Then I used this tutorial (more or less) to make a stencil in Photoshop.  I decided to stencil the black outlines and fill in the rest with a paintbrush.  I'm sure there are simpler ways to do this, and you could definitely leave out more of the details and still get the general idea, but that's what I thought would work best for how we wanted it to look.  We decided to leave out the part below the belt.

Cutting took around 2 1/2 hours, even leaving out some of the smallest details.  My tips for such intricate freezer paper stencils (other than giving yourself a lot more time than I did) are to: 
  • Print out a copy on regular paper to use as a map of sorts to keep track of the pieces as you cut.
  • Keep the map and pieces on a tray so nothing gets lost.  I used a jelly roll pan.
  • A hole punch works great for the tiny circles.
  • Have a tweezers handy! 

After all that time cutting, I was pretty worried I would screw it up, but the outline turned out great.  Then I used a small -- very small -- paint brush to fill in the red and silver.   You could also cut the stencil so that you're painting the silver and red parts and then add the outline after.  It would be easier cutting for sure, but I wanted the placement of all the black elements to be exact.  Yes, I may have a problem.  The painting was actually really fun.  If I had spread this project out over a few days, I would have enjoyed it a lot.  It was cool to see it all come together.  O was home by the time I was painting, and he was really encouraging about how it was looking.  That was pretty adorable.


He went to bed before I had finished the silver, though, so the final product reveal this morning.  He was thrilled, which made the many hours so worth it.  We both agreed that the image could have been a bit larger, but that it looks good anyway.


He commented many times on how accurate all the details were and how I had only left out a few tiny things.  He said something like, "Anyone who knows Lego Hero Factory would know right away that this is Splitface's chest plate!"  Haha.  I think that's a small target audience, especially since it's a discontinued model, but I'm so happy that he loves it.


I can't imagine there are a lot of people out there who want a Splitface shirt and would like to put several hours into making one, but since I made the stencil template, I put it up here.  If anyone DOES make one, I'd love to see it!

Happy Birthday, O!

Saturday, May 3, 2014

A Trio of Lady Skaters

I might have a bit of a Kitschy Coo Lady Skater addiction.  I made my first one back in March out of a jersey sheet, thinking it would just be a muslin, but it turned out so cute that I ended up finishing it up. The fabric's a bit thin, but it'll be great for around the house in the summer and is wearable in public with a slip.  O took a quick phone pic for me when I made it. 


The size 3 fit almost perfectly right off the bat; I just decided to add 1/2" to the shoulders for future makes.  RTW shirts hardly ever have shoulders wide enough for me, so this whole sewing for myself thing has some exciting benefits.  :)  The waist on RTW dresses is nearly always about an inch too high, too, but this one is spot on.

I used some charcoal stretch french terry that's been in my stash for a shamefully long time for a long sleeved version.

Accessorizing with my boot toppers!
The widened shoulders fit perfectly now, but I should have (and since have) added another inch to the sleeve length.  I measured the pattern pieces, but forgot to think about them riding up when bend my elbow.  Obviously still new to this whole fitting thing.  Ha.  This knit is also firmer than the sheet I used for the muslin, so it's a little snugger than I wanted through the torso.  Ray said it was fine, but he has never, ever thought anything was too tight or too short, so he's not overly reliable.  A friend who I trust to be brutally honest said it's fine, so I'm hoping she's right.  

See?  Kinda tight.  I think some of the problem is that I feel completely awkward and am therefore standing funny.

Snugness aside, I really like this one.  I said on Instagram that I was planning on wearing it every day and just changing tights and accessories.  I was only sort of kidding.

Photo by O.  He was directing me and was pretty funny about it.
My third and favorite I just made today for Selfish Sewing Week.  I'm totally in love with it, so there are lots of pictures.  I used a leopard print knit from fabric.com that was listed as primarily cotton, but it felt off and then melted when I used a hot iron, so I think it's mostly poly.   I'm more of a natural fibers girl, so I was kind of bummed, but it doesn't really wrinkle, so that's a bonus.

This time I went with 3/4 length sleeves (with the additional inch added, and I'm so glad I did that) and a keyhole cut out in back using this tutorial.  I felt like Goldilocks applying the binding because it took me three tries. The first time was too loose, the second was two tight, but the third was just right!


I ran into some bulk issues where the seam allowances from the keyhole binding meet the neckline binding.  It doesn't look too bad from the right side, but the inside is ugly.  Good thing no one inspects my clothing.


This fabric was a little firmer than the muslin too, so I sewed the side seams at 1/4" instead of 3/8" and it's about perfect. 
 

So yeah, kind of obsessed with this pattern. I want to make another short sleeved one in nicer fabric, and then a sleeveless one, and maybe one with a gathered skirt...


Friday, May 2, 2014

Selfish Sewing (er, Knitting) Week: Thicket Hat

It's Selfish Sewing Week hosted by Rachael of Imagine Gnats!  It's perfect for my 2014 goal of making more things for myself, so when I saw a call out for knitters, I jumped at the chance.  One can never have too many hats.  I chose to knit up Thicket by Brooklyn Tweed, since you know I'm all about cables.


My first try, though, was a fail.  I should have gone with my gut, along with a few Ravelry projects that said the pattern runs big.  I tend to be all, "Oh, I'll knit this up and even though it seems like way too many stitches for a worsted weight hat, it'll be fine!"  And then no.  Ginormous.  It's kind of cute from the back and side, but just silly from the front, not to mention in danger of falling off any second.  I know some people wear hats this slouchy and look adorable, but it doesn't work for me.

Shoddy bathroom selfie
I absolutely LOVE the cable pattern, though, so I sat down and figured out how I wanted to size it down.  How great is this detail?  I love how twisted stitches pop.


I dug through my stash and found this Knit Picks Merino Style, which was sold as DK weight, but knits up as more of a light worsted.  Then I cast on only 110 stitches and did five repeats of the pattern instead of six.  I also skipped to row 36 after I finished knitting row 27.  That did the trick.


Just the right amount of slouch

I love how the top comes together and forms petal-like shapes.  Having five sections makes it look like a star.


The main pattern is a chart only, not written out.  When I first started knitting, I thought charts were super intimidating, but once I used one, I was sold on them.  It's much easier to "read" your knitting, especially if you have to rip back a few rows.  Not that I ever have to do that because I was distracted while binge-watching Supernatural on Netflix...


One of the cables requires you to hold one stitch to the front and one to the back, so if you don't already know how to cable without a cable needle, I would highly recommend learning.  It made things much simpler.


Now that I've finished up my selfish knitting, I have some selfish sewing lined up.  I've been so inspired by the other SSW projects on the Kollabora page, as well as these participating bloggers:

milkybeer · Behind the Hedgerow · jm_subrn · Sew What, Sherlock? Lladybird · sew Amy sew · the Brodrick Design Studio · adirondack inspired The Crooked Banana · Sewbon · Idle Fancy · girl like the sea oona aloona · Lauren Dahl · verypurpleperson · la inglesita Groovybaby...and mama · Buzzmills · La Pantigana · sew a straight line Dandelion Drift · JustMeJay · B Yazoo · Disaster In A Dress the quirky peach · Fishsticks Designs · Seamstress Erin · a happy stitch Casa Crafty · Sarah Jane Sews · YoSaMi · Call Ajaire · miss matatabi
 
There's also a fantastic giveaway that you can enter below!
a Rafflecopter giveaway